Princess Castle Cake
1 Hour
30 Minutes Total
24 Servings
This magical princess castle cake recipe will be sure to impress at any girl’s birthday. Almost too pretty to eat, its moist sponge and irresistible icing make for a wonderful treat. Follow our simple step by step instructions for how to make a princess castle cake below.
Ingredient List
Cake
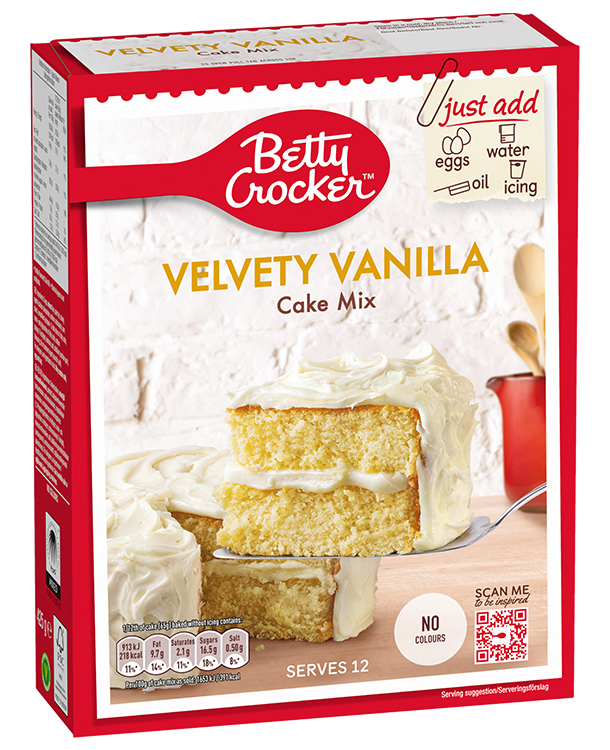
- 2 boxes Betty Crocker™ Velvety Vanilla Cake Mix
- 180 ml vegetable oil (8tbsp)
- 6 medium free range eggs
- 360 ml water
Decoration
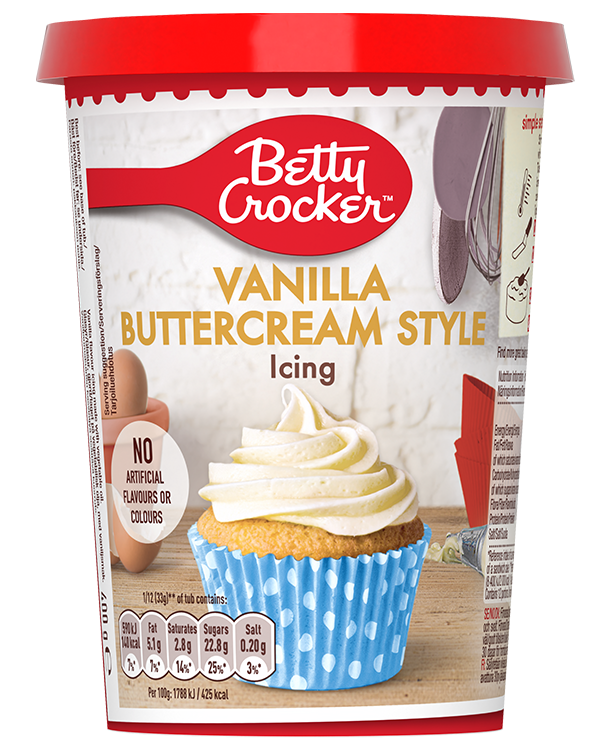
- 3 tubs Betty Crocker™ Vanilla Buttercream Icing
- Pink food paste colouring
- Green food paste colouring
- 7-9 wafer ice cream cornets
- Sprinkles
- Pink pearl sugar balls
Preparation
- Preheat your oven to 180°C (160°C for fan assisted ovens) / Gas Mark 4. Grease the tins or line with greaseproof paper.
- Mix the eggs, oil, water and Velvety Vanilla Cake Mix gently together and whisk (by hand or electric mixer) for 2-3 minutes until smooth and creamy.
- Pour the mixture evenly into your well-greased tins. Put half the mixture into 2 x 8” rounds and the other half into 3 x 6” round cake tins.
- Bake in the centre of the oven for 22- 27 minutes or until a rounded knife inserted into the centre of the cake comes out clean. Cool for 10 minutes in the tin then cool on a cooling rack.
- Colour 2 ¼ tubs of Vanilla Icing with pink food colouring to the desired level of pink and ice each of the layers of cake sponge. Start by placing the two 8” round sponges on top of each other and then add the three 6” round sponges on top.
- Spread a thin layer of icing evenly around the outside of the cakes with a knife, stack the smaller cake in the middle of the larger cake. Place in the fridge for 30 minutes to harden and form the basis of a crumb coat for perfectly smooth icing.
- Ice another layer of icing for a smooth, crumb free finish.
- Measure a cornet up to the height of the bottom cake and cut the point off at the same height. Do this for 2 of the cornets. Attach to the front and back of the cake.
- Cover the cornets with pink icing, making sure you cover all the wafer. Using the palette knife create vertical grooves over the walls and cornet turrets around both tiers.
- Ice 5 cornets with pink icing and roll in a shallow bowl filled with sprinkles. Place the top turret onto the bottom turret and gently cover up any joins with pink icing.
- Create a path by spreading some pink icing on the cake board.
- Colour ½ a tub of Vanilla Icing with green food colouring, mix and spread over the rest of the cake board. Create peaks for the grass by tapping the palette knife onto the green icing quickly.
- Fill a disposable piping bag with a small amount of green icing and snip off the point to create a small tip. Pipe green vines up the side of the turetts and walls.
- Pipe a door to the castle using the remaining vanilla icing in a disposable piping bag and also pipe dots for the flowers. Use the pink pearl sugar balls for front door knobs and flower centres.
- Fold a piece of pink paper in half and cut 5 flag shapes. Glue the centre of the flag, insert a cocktail stick and fold over to create a flag. Do this 5 times. Dig the cocktail sticks into the top of the turrets. Make the front flag poles shorter and the back ones higher with the centre one being the highest.