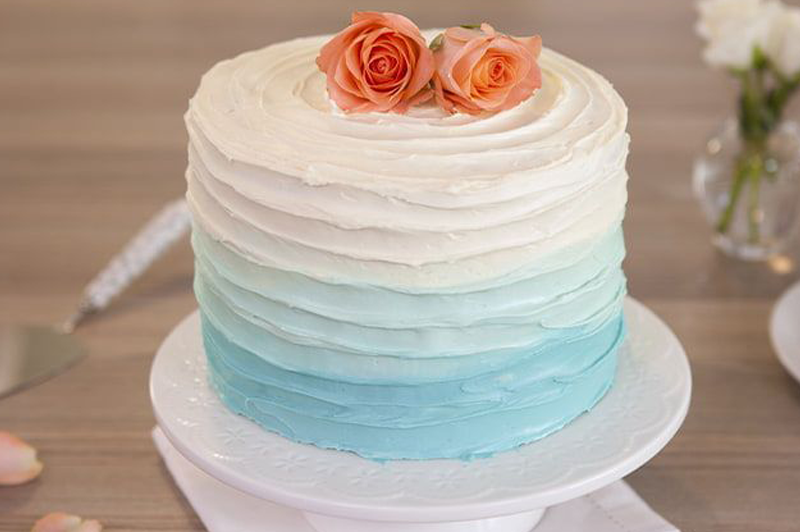
How to Ombre Ice a Cake?
Recreating the ombre effect for your bakes is an instant way to make a cake look chic and professional. We can teach you how to ombre ice a cake, so you can wow your friends and family.
Top tip: Generally, this icing method works best with a three-layered cake. The height will make sure there is enough room for the colours to gradually change. We also recommend once your cakes are baked to add a crumb coat and place your cake in the fridge for 30 minutes before applying your ombre icing.
- Prepare or mix your buttercream – we recommend a vanilla buttercream – and then separate it into three bowls.
- Choose one type of food colouring, and then tint each bowl. In the first bowl, leave the buttercream white, or add only a couple of drops of colour and mix well. In the second, add more drops than the previous bowl to create a more vibrant colour of icing. In the last bowl, use as many drops as it takes to ensure the icing is the brightest of the three. Transfer your icing into three piping bags.
- Pipe the darkest/brightest colour icing around the bottom layer. Do not worry about smoothing the icing out at this stage. Pipe the second darkest/brightest colour icing around the middle layer, and the lightest colour on the highest layer. You should also ice the top of the cake with the lightest colour icing.
- With a palette knife, start smoothing the icing all around the cake. Don’t worry if the colours start to blend at the edges as that is part of the effect. Just make sure you clean your palette knife after you finish the sides of the cake, and before you get to the top – this will ensure the top of your cake stays light and bright.
For a start to finish guide, go to our Ombré Cake recipe page!