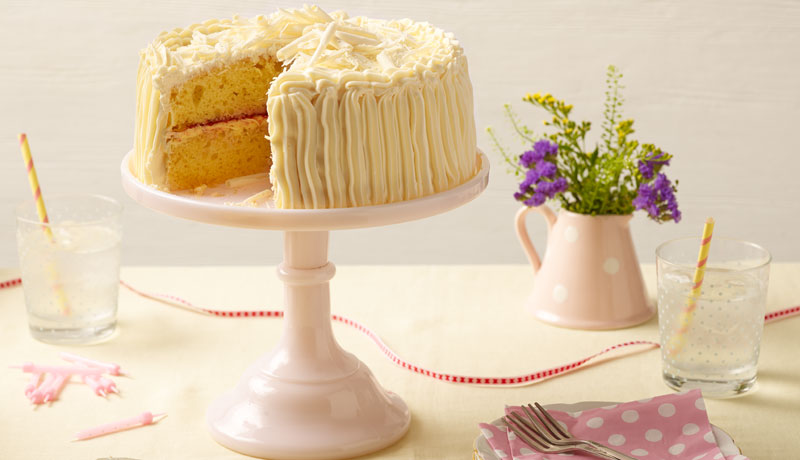
White Chocolate Victoria Sponge Cake
Total Time: 1 Hour
05 Minutes
Servings: 12
This easy recipe makes a deliciously creamy white chocolate and raspberry cake topped with white chocolate curls. Simply wonderful!
All You Need Is ...
Cake
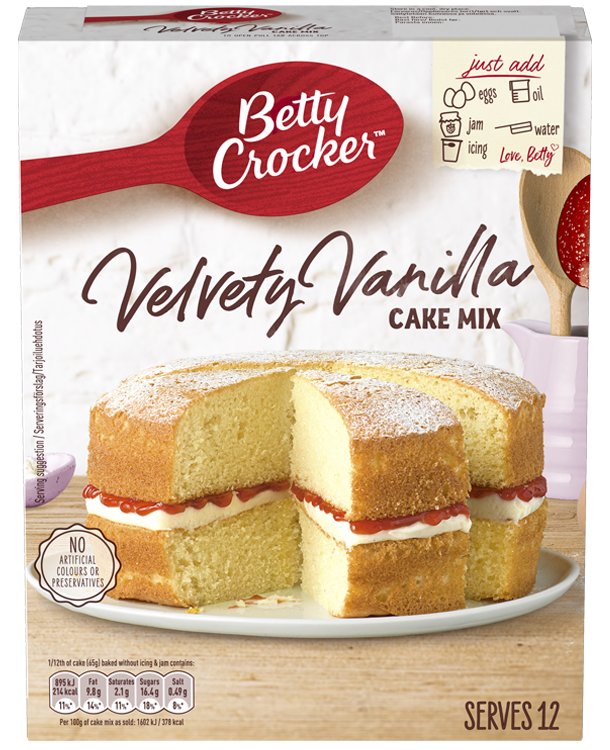
- 1 box Betty Crocker™ Velvety Vanilla Cake Mix
- 90 ml vegetable oil
- 180 ml water
- 3 medium free range eggs
- 100 g white chocolate, melted
- 25 g white chocolate chips
Topping and Filling
- 2 ½ tubs Betty Crocker™ Velvety Vanilla Icing
- 150 g raspberry jam
- 100 g white chocolate
Betty's Easy Steps
- Preheat your oven to 180°C (160°C for fan assisted ovens) / Gas Mark 4.
- Mix the eggs, oil, water and Classic Vanilla Cake Mix gently together and whisk (by hand or electric mixer) for 2-3 minutes until smooth and creamy. Fold through the melted white chocolate and 25g chocolate chips.
- Pour the cake mix evenly into your two greased cake tins.
- Bake in the centre of the oven for 22-27 minutes, or until a skewer inserted into the centre of the cake comes out clean, then cool on a wire rack.
- Spread half a tub of the Buttercream Style Icing onto the top of ones of the cakes. Top with the raspberry jam and then cover with the other cake. Spread the remaining half tub of buttercream all over the cake to fully cover in a thin layer.
- Place the remaining icing into the piping bag with the star nozzle. Using the bag, gently press lengths of the buttercream vertically up the sides of the cake. Finish with a border around the circumference of the top of the cake creating a wave star pattern by pressing a dot of the icing onto the cake and gently pulling along horizontally before breaking off. Continue to do this all the way round. This creates a border for all the white chocolate curls.
- Decorate with chocolate curls. Turn the chocolate over so the flat side is facing upwards. Using the peeler press down hard onto the chocolate and pull the peeler towards you, keeping an even pressure on the peeler. The chocolate should begin to curl and you will be able to see it roll up. Any off cuts can be used in the under layer, with the best curls on top! Keep the best curls for the top.
- Cover the top of the cake with the remaining gratings then top with the best curls.
Betty's Tips
- The chocolate has to be a particular temperature to achieve the best curls. However all the offcuts and curls that didn’t work, will go on top of the cake scattered around. You only need a few good curls to make the cake look gorgeous!
- If the chocolate gets too hot and begins to melt you can place into the fridge for 5-10 minutes. The same with the curls - they are best kept in the fridge until you decorate the cake.